Posts

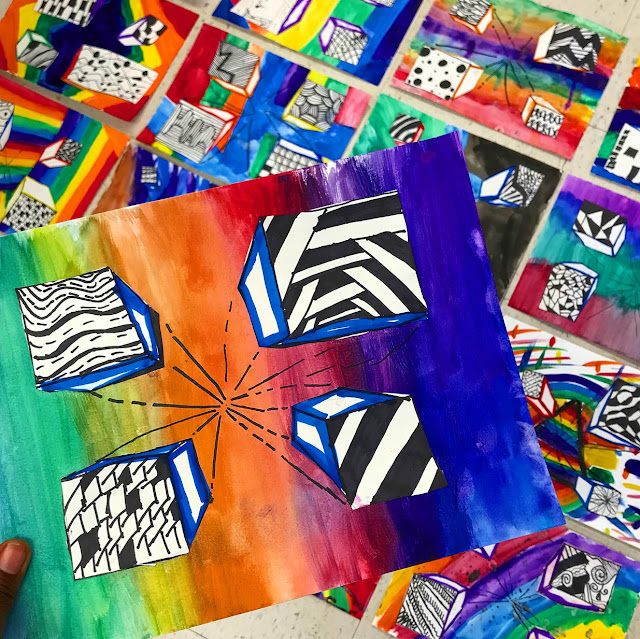
First Day In Art Class- "Painted Papers"

Image
Hi everyone!  It has been a while since I have written a blog post.  Since my last post: -I've bought a house. -Graduated from grad school. -Had a baby.  and as we all are--- currently surviving a pandemic.  But I am excited for the new school year, nonetheless. With the start of another school year comes the dread of creating a fun and engaging lesson for the first visit. I don't know about you, but I always have a hard time coming up with something interesting. This year I stuck with something simple yet fun.  I teach upper elementary, so each grade level did the exact same lesson-- Kwik Stix "Painted papers" using Analogous colors.  I always start my first visit to art with my rules and expecations video. Back when Bitmojis were a hit in the classroom, I made a video explaining the rules of the art room. Its only 5 minutes, keeps the kids' attention, and I don't have to say the same thing one million times--at two schools.  Next, we reviewed analogous color

Exploding Boxes- 1pt Perspective Drawings

Image
I can say that I have had tons of fun working on a few new lessons with my kiddos! The Exploding Boxes being one of them. Last year was YEAR ONE for me and for some odd reason I stayed far away from ANY lesson that dealt with perspective. Perspective was difficult for me in school, so I felt extremely uncomfortable teaching it. But I figured this was a very valuable lesson to teach to students-- logical, process-based, and quite mathematical. I put on my thinking cap. I decided to play around with perspective drawings one day afterschool. I wanted to keep it SIMPLE. So, I just drew a few boxes in One Point Perspective. I figured this would be easy enough to teach to my 4th graders. I tried out this lesson with my gifted and talented students first. We always meet afterschool for about an hour to learn and work on new projects. I figured drawing the boxes in one point perspective would be engaging and challenging for this group. I started off the project by teaching st

Chris Uphues and Dasic Fernandez inspired Valentine's Day Project

Image
Well, well, well! We made it through the year of January! At least it felt like a year to me. I hope your New Years Resolutions are still in effect and if not--hey we still have 11 more months!  Valentine's Day is coming up and if your like me, you wait until the last minute to come up with a project. Thank goodness I've stayed loyal to one of my New Year's Resolutions-- Try to stay two steps ahead.  I was introduced to the artist Chris Uphues (Instagram: @chrisuphues) by the wonderful Cassie Stephens and I LOVED his awesome work. The precious hearts that he paints are so unique and fun! Source: https://chrisuphues.com/pages/commissions I decided to pair this artist with another- Dasic Fernandez. If you haven't heard of him, check him out on Instagram @dasicfernandez. He paints beautiful drips of paint- and sometimes creates imagery with his drips! Source: https://news.1xrun.com/dasic-fernandez-throws-down-on-the-dance-floor-in-paradise/

A Fun, New Color Theory Lesson!

Image
Yeah, I KNOW! It's been a WHILEEEE. HAPPY NEW YEAR! I am back with a new post on a lesson I did a month ago with my Art Ideals kiddos. I'd been searching for a color theory lesson for eons and none of them really tickled my fancy. So I got out my sketchbook and came up with my own. I knew for a fact that I wanted to include a bit of color mixing in this project. I immediately thought--VENN DIAGRAM!! My students know what these are and they also apply to the idea of color mixing. The color on the left and the color on the right MEET to make a new color. Boom. We've got a plan. I also wanted this lesson to be abstract considering I hadn't done an abstract art project EVER so I settled on the basis of shapes and line. Simple. We started out by tracing paper plates and tops of cups to make irregular Venn diagrams. We used 18"x24" paper so these were BIG!   I wanted to make sure that we were able to mix every secondary color. We made four

S.T.E.A.M. Night- Pendulum Painting

Image
Hi, guys! Thanks for taking the time to read today! I wanted to share with you the activity I did with my students on S.T.E.A.M. night! Our theme this year was "S.T.E.A.M Night- Awaken your YET!" I designed our t-shirts this year using the Star Wars font and of course a little calligraphy! Originally, my idea was to do BLACKLIGHT Pendulum Painting. I envisioned blacklights, glow in the dark paint, (yada, yada, yada) and as we know- sometimes things do not go as planned. I ordered LED blacklights from Amazon and I thought that three came with the purchase, but I only recieved one. (Reading is fundamental, folks.) So, our ONE blacklight became a decorative piece to light up our neon paint in the back of the room. Anywho- the session still turned out great! I created seven pendulums using dowels, rubber stoppers, waterbottles, yarn, twine, and tape. I spent about 1.5 hours making all seven and once you get the hang of it you can go pretty fast!