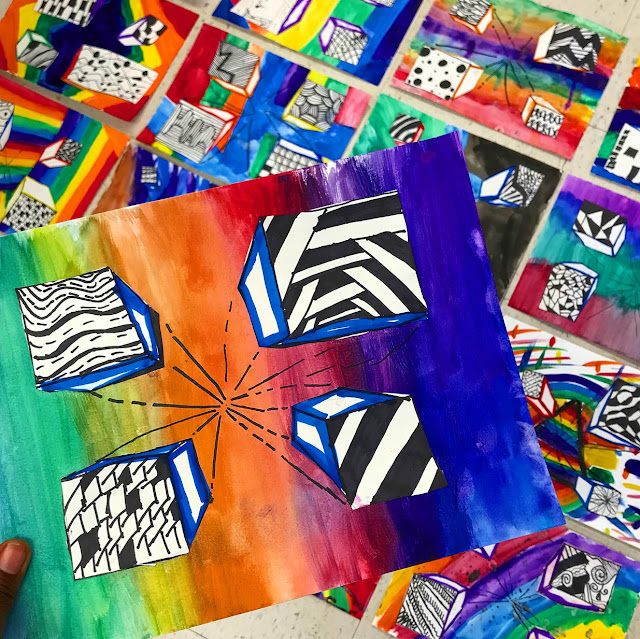
I can say that I have had tons of fun working on a few new lessons with my kiddos! The Exploding Boxes being one of them.
Last year was YEAR ONE for me and for some odd reason I stayed far away from ANY lesson that dealt with perspective. Perspective was difficult for me in school, so I felt extremely uncomfortable teaching it.
But I figured this was a very valuable lesson to teach to students-- logical, process-based, and quite mathematical. I put on my thinking cap.
I decided to play around with perspective drawings one day afterschool. I wanted to keep it SIMPLE. So, I just drew a few boxes in One Point Perspective. I figured this would be easy enough to teach to my 4th graders.
I tried out this lesson with my gifted and talented students first.

We always meet afterschool for about an hour to learn and work on new projects. I figured drawing the boxes in one point perspective would be engaging and challenging for this group.
I started off the project by teaching students how to draw STRAIGHT lines using a ruler.
We practiced:
1. Holding the ruler.
2.Shifting the ruler on the paper.
3. Using the straightedge of the ruler.
I taught my students to use strong "piano fingers" in the middle of their ruler when holding the ruler on the paper. This helps keep the ruler from moving while drawing along the straightedge. Like SO:
***IMAGE ABOVE FROM: https://www.skoove.com/blog/2019/06/11/finger-positioning-on-piano-finding-the-right-fingers-for-the-right-keys/
I even emphasized which hand is doing what job. It may seem quite silly to even remind students of such- but many haven't used a ruler in such a way. I would say, "I am holding my pencil with the hand that I write with and I am holding the ruler down with the hand I do NOT write with."
We drew our perspective lines to get us started, and drew the boxes in as you normally would. With my Gifted and talented group, we made boxes using perspective. I tried this same lesson with my other kiddos except we did not create boxes- we just used the perspective lines as they were. You will notice the images I've used will show examples of how different the projects can look.
We erased the perspective lines which only left the boxes. The next step was to add zentangles to the front face of each box. My classes are 45 mins. so this took pretty much all of that time for Day One.
On Day Two, we painted our backgrounds. I allowed the students to get as creative with this as they liked. I did this part of the lesson several different ways. One class used markers, one used glitter paint, another metallic, and many classes used tempera cakes to design their background.
On the final day- DAY THREE- we cut out our boxes and pasted them on our backgrounds. We wanted them to be similar to the previous arrangement prior to cutting them out. In the middle of the the boxes, we added a few "exploding lines" to really make them pop!
A pretty quick and easy lesson that was super fun! :) Let me know if you give it a try!
Don't forget to share and follow on Instagram @thebusybrushes!


Are you looking for baby clothing and accessories online? There are so many great affordable online marketplaces where you can buy good-quality baby accessories and you will never regret buying them. To buy baby accessories online I highly suggest you check out Toy Sharp online store. Toy Sharp offers the best baby stuff in town, all sorts of products such as easy brushes, breastfeeding pillows, bath toys, gigantic unicorns, etc, you can buy from one single platform at the lowest price.
ReplyDeleteChildrens Anti Blu Ray Glasses
Cute Elephant Sprinkler Bath Toy
Easy Brush for 360 Brushing